Thermal
Thermal Drone Guide

Fly smart and stay safe out there! Is this your first Thermal drone? Discover free resources to learn the basics here. Ready to earn your FAA commercial drone certificate? Start preparing today right here.
Thermal Drone Guide: A Beginner’s Handbook to Aerial Infrared Imaging
Ever wondered what drones can see that the human eye can’t? Thermal drone imaging opens up a world hidden in plain sight—one where heat tells the story. Whether you’re searching for missing persons, checking for roof leaks, or scanning solar panels for faults, thermal imaging gives you the power to see what others miss.
This guide is built for beginners—no jargon, no assumptions, just real-world advice on how to get started with thermal drones. If you’re a homeowner, contractor, farmer, first responder, or just a curious tech enthusiast, you’re in the right place.
In the pages ahead, we’ll explore what thermal drone imaging is, how it works, where it’s being used, and what you need to get started. We’ll walk through equipment suggestions, first-flight tips, software tools, and even show you how to turn this skill into a service.
By the end of this guide, you won’t just understand thermal drones—you’ll be ready to launch.
Article Guide
- What Is Thermal Drone Imaging?
- How Thermal Drones Work
- Core Use Cases Across Industries
- What to Look for in a Beginner Thermal Drone
- Software for Thermal Imaging Analysis
- Getting Started: Your First Thermal Flight
- Scaling Up: Growth Paths in Thermal Imaging
- Conclusion: From Curious to Capable
- FAQs – Frequently Asked Questions
What Is Thermal Drone Imaging?
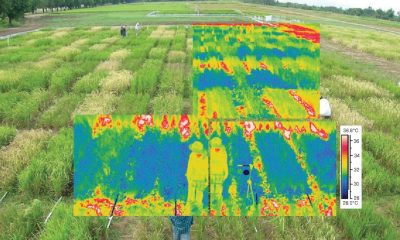
Thermal drone imaging is the process of capturing infrared radiation—heat—using a drone-mounted thermal camera. Unlike standard drones equipped with RGB (red, green, blue) cameras that see the world as we do, thermal drones visualize temperature differences in the environment. This opens the door to powerful insights invisible to the naked eye.
Everything with a temperature gives off infrared radiation. Thermal cameras detect this radiation and translate it into images where warmer areas appear brighter and cooler areas darker, or vice versa, depending on the color scale used. These images are called thermograms and can be analyzed in real time or after the flight.

A thermal drone combines two technologies:
A drone platform for stable flight, mobility, and reach
An infrared camera sensor that captures heat data
When these two work together, the result is a highly mobile, airborne thermal scanner capable of surveying wide areas quickly, safely, and without physical contact.
One key difference between RGB and thermal imaging is that thermal cameras don’t rely on ambient light. That means they work just as well in total darkness as they do in daylight—an essential feature for nighttime operations like search and rescue.
In short, thermal drone imaging gives you a different kind of vision—one that reads the world through temperature instead of light, revealing problems, patterns, and opportunities that would otherwise remain hidden.
How Thermal Drones Work
At first glance, a thermal drone might look just like any other quadcopter—but what sets it apart is what it sees, how it sees it, and what it can do with that data. Let’s break it down into the core components and processes that make thermal drone imaging possible.

The Core Components
1. The Drone Platform
This is the physical aircraft. For beginners, most thermal drones are either pre-assembled or come as add-on kits that include a flight-ready drone with integrated stabilization, GPS, and obstacle sensors. Your drone is your eyes in the sky, giving you mobility and positioning.
2. The Thermal Camera
Mounted underneath or integrated into the drone, the thermal camera detects heat (infrared radiation) instead of visible light. Each pixel in the image corresponds to a specific temperature value. Higher-end thermal cameras also include radiometric data, meaning they capture exact temperature readings for every point in the image.
3. The Flight Control & Image Transmission System
While the drone flies, it streams the thermal feed live to your remote controller, tablet, or ground station. Many systems allow you to switch between RGB and thermal views, adjust the color palette, or even overlay the two images in real time. This makes it easier to interpret what you’re seeing on the fly.
4. The Storage System
Images and videos are usually saved to a microSD card onboard the drone or the camera module. Some advanced models also support real-time uploads to cloud platforms for fast analysis and sharing.
A Simple Example: Roof Inspection in Action
Imagine you’re flying over a house to check for heat loss. As the drone hovers, the thermal camera picks up warmer spots along the roofline where insulation may be weak. Cooler areas show better insulation. You toggle between the thermal view and RGB view to identify the exact location visually. In just minutes, you’ve done what might have taken hours with ladders, scaffolding, and guesswork.
From Sensor to Insight
The magic of thermal drones lies in the synergy:
The drone positions the sensor with stability and reach
The thermal camera collects heat data from hard-to-reach places
The software translates it into insights—highlighting problems, efficiency gaps, or areas of interest
This layered system allows you to safely monitor, inspect, and analyze environments that would otherwise be risky, time-consuming, or impossible to assess from the ground.
Core Use Cases for Thermal Drones Across Industries
Thermal drone imaging isn’t just high-tech novelty—it’s a practical tool solving real problems across a range of industries. Because it can detect heat signatures from the air, it opens up efficient, contactless ways to inspect, monitor, and assess areas that would otherwise require scaffolding, ground teams, or time-consuming manual checks.

Here’s how thermal drones are being used in the real world today:
Building & Roof Inspection
Thermal drones are frequently used by contractors, home inspectors, and property managers to detect:
Heat leaks
Moisture trapped in walls or roofing
Faulty insulation
HVAC inefficiencies
Example: A drone flight over a commercial building identifies heat escaping from seams in the flat roof, helping guide targeted repairs.
Agriculture & Crop Health Monitoring
Healthy crops radiate heat differently than stressed or diseased ones. Thermal drones help:
Detect irrigation problems
Spot crop stress before it’s visible
Analyze field drainage
Monitor livestock
Example: A farmer uses a thermal scan to find dry zones in a crop field, revealing a failed irrigation section before visible damage occurs.
Solar Panel Inspection
Solar panels operate most efficiently when evenly heated. Hotspots usually indicate faulty cells or connections. Thermal drones allow:
Quick scanning of large installations
Detection of overheating panels
Reduced inspection time with no rooftop walking
Example: A technician flies a drone over a solar farm and spots two panels with irregular heat patterns, marking them for replacement.
Public Safety & Search and Rescue
Infrared imaging cuts through darkness, smoke, and vegetation. Thermal drones are used to:
Locate missing persons in remote or wooded areas
Detect hidden fires or hotspots
Monitor fire lines at night
Track movement without a direct line of sight
Example: In a forest rescue mission, responders deploy a drone that quickly spots the heat signature of a missing hiker under tree cover.
Wildlife Monitoring & Management
Thermal drones offer a non-invasive way to:
Count animals at night
Track movement patterns
Monitor habitats with minimal disturbance
Example: A conservation team monitors nesting grounds using drones that pick up body heat without startling the animals.
Utilities and Infrastructure
Inspecting long pipelines, electrical substations, and transmission lines is time-intensive on foot. With thermal drones, teams can:
Detect leaks or overheating components
Check insulation or line sagging
Cover miles of infrastructure in a single flight
Example: A drone scan identifies a hot transformer connection in a substation, preventing a possible equipment failure.
What to Look for in a Beginner Thermal Drone
If you’re new to thermal imaging, choosing your first thermal drone can feel overwhelming—but it doesn’t have to be. The right setup balances performance, ease of use, and budget. Below are the key features to prioritize as a beginner, along with recommendations that won’t break the bank.
Key Features to Consider
Thermal Resolution
Higher resolution means more detail. For basic inspections, look for cameras with at least 160×120 resolution. Entry-level radiometric sensors (which record temperature values per pixel) start at 320×240.
Visual (RGB) Camera Integration
Many thermal drones include both a thermal and standard camera. This lets you overlay or compare images for clearer context.
Flight Stability & Ease of Use
Autonomous flight modes, GPS hold, and obstacle avoidance make flying smoother and safer—especially if you’re multitasking with thermal views.
Battery Life & Range
Look for drones with at least 20–30 minutes of flight time per battery. Range matters less for beginners, but 2–4 km control distance is typically sufficient.
Software Compatibility
Beginner drones should pair well with thermal imaging software for easy post-processing. Compatibility with FLIR Tools, DJI Thermal Analysis Tool, or cloud-based solutions is a plus.
Portability & Build
Foldable drones are easier to store and carry. Lightweight, weather-resistant builds are useful for field work.
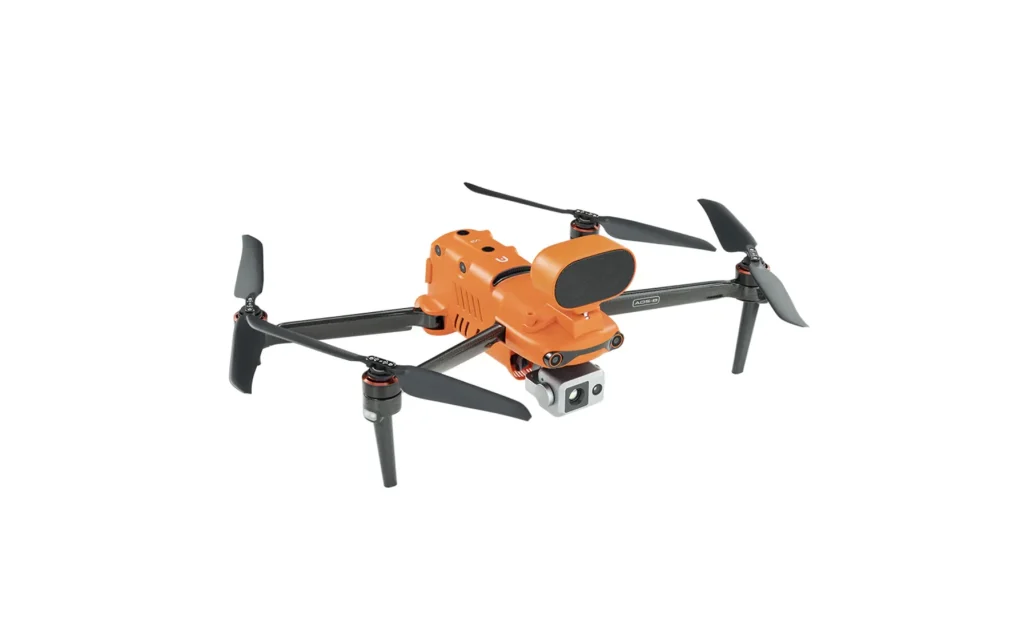
Recommended Beginner-Friendly Thermal Drones (2025)
Here are a few trusted entry-level options with solid reputations:
Thermal resolution: 640×512
RGB camera: 50MP
Battery: ~38 minutes
Price: Around $7,000 CAD
Best for: High-resolution thermal imaging with an intuitive interface
This drone is a favorite among beginners for its crisp imaging, solid build, and user-friendly software integration right out of the box.

Thermal resolution: 640×512
RGB camera: 48MP
Battery: ~45 minutes
Price: Around $5,000 CAD
Best for: General inspection, public safety, multisector use
Known for its long flight time and seamless DJI ecosystem, this drone is ideal for those who want reliability with strong mapping support.

Thermal resolution: 320×256
Zoom RGB camera: 32x
Battery: ~32 minutes
Price: Around $8,500 CAD
Best for: Government, environmental, tactical inspections
Compact, rugged, and NDAA-compliant, it’s well-suited for government and field-based users.
4. FLIR SIRAS

Thermal resolution: 640×512 radiometric
RGB camera: 16MP
Battery: ~31 minutes
Price: Around $9,000 CAD
Built for professional-grade inspections with FLIR’s signature radiometric accuracy and modular design.
Software for Thermal Drone Imaging Analysis
Capturing thermal images is only half the story—what truly brings value is how you interpret that data. That’s where thermal imaging software comes in. Whether you’re identifying a hot solar panel, diagnosing moisture in a roof, or reporting findings to a client, the right software can make your workflow easier, faster, and more accurate.
Onboard vs. Post-Processing Software
Onboard Tools
Many beginner-friendly drones offer built-in features for basic thermal interpretation:
Live view color palette switching (white-hot, ironbow, rainbow)
Spot temperature readings
Picture-in-picture overlays of thermal + RGB
These tools are helpful during flight, but limited in deeper analysis.
Post-Processing Tools
Once the flight’s complete, you’ll want software that can:
Analyze temperature values pixel by pixel (radiometric data)
Generate detailed inspection reports
Compare multiple images side-by-side
Annotate, tag, and export data for clients or team review
Features Beginners Should Look For
Simple interface with drag-and-drop or auto-import from your drone
Radiometric support for analyzing heat values per pixel
Color palette control to adjust contrast and clarity
Measurement tools (e.g., spot temp, area averages)
Report templates that save time and look professional
Recommended Software for Beginners
1. FLIR Thermal Studio Suite
Great for: FLIR-based drones or third-party thermal cameras
Features: Radiometric analysis, batch processing, report builder
Pricing: Free basic version; paid plans from ~$300 CAD/year
2. DJI Thermal Analysis Tool 3.0
Great for: DJI Mavic 3T, Matrice series
Features: Temperature measurements, image comparison, analysis overlays
Pricing: Free for DJI drone users
3. Pix4Dreact (with thermal support)
Great for: Quick mapping and emergency response
Features: Thermal orthomosaic creation, rapid image alignment
Pricing: ~$300 CAD/year (educational and trial versions available)
4. DroneDeploy with Thermal App Integration
Great for: Professionals looking to scale operations
Features: Cloud-based workflow, 3D thermal mapping, client sharing
Pricing: Starts around $2,000 CAD/year for business plans
As a beginner, start simple. Free or built-in software tools are often more than enough for your first few flights. Once you start working with clients or performing deeper analysis, upgrading to a full post-processing suite will give you more power and polish.
Getting Started: Your First Thermal Drone Flight
So you’ve got your drone, the software’s installed, and your batteries are charged—but how do you actually get started? Your first thermal flight doesn’t need to be complicated. In fact, it’s better to begin simple and build confidence before jumping into complex inspections or commercial jobs.

Pre-Flight Checklist
Before every flight, especially when thermal imaging is involved, double-check the following:
Battery levels (drone, controller, and mobile device)
Camera lens is clean (especially the thermal sensor)
MicroSD card is inserted and has enough space
Thermal and RGB cameras are set up properly in your app
Flight restrictions or airspace rules are reviewed (especially in residential or sensitive areas)
Firmware and app updates are completed beforehand
Ideal Conditions for Thermal Imaging
Thermal imaging works best when surface temperatures differ noticeably. For optimal contrast:
Fly during early morning or evening (less sun, more temp variance)
Avoid rain or strong wind, which can distort readings
For roof or building scans, ensure sunlight hasn’t recently heated the surface—thermal lag can mask heat loss
Sample Beginner Flight: Shed Heat Check
Scenario: You want to scan your backyard shed for insulation issues.
Steps:
Launch your drone and hover ~15–20 meters above the shed.
Switch to thermal view in your app.
Slowly orbit the structure while adjusting the angle to check the roof and walls.
Capture images showing temperature differences—look for warmer spots (heat escaping) or cooler areas (moisture intrusion).
Land the drone, download your images, and analyze them with your software.
Interpreting Your First Thermal Images
What you’ll likely see:
Bright (warm) areas may indicate heat loss, machinery, or sun exposure
Dark (cool) areas could indicate shaded surfaces, moisture, or poor insulation
Don’t expect fine detail—focus on patterns and temperature distribution, not sharp edges
Common Mistakes to Avoid
Flying too fast: Blurred thermal images are harder to analyze.
Ignoring wind and weather: They can cause false readings.
Overexposing the image: Adjust your thermal palette for better contrast.
Skipping RGB context shots: Always take matching regular images for comparison.
Your first flight isn’t about perfection—it’s about getting familiar. Don’t worry about creating flawless reports or complex analysis right away. Focus on understanding how your drone responds, how thermal images look, and how to safely collect data.
Scaling Up: Growth Paths in Thermal Imaging
Once you’ve completed a few thermal flights and feel confident interpreting basic imagery, you may start thinking, “What’s next?” Thermal drone imaging offers a range of paths—from professional certification and specialized industries to side income and full-time service opportunities.
Whether you want to keep it as a hobby or turn it into a business, here’s how you can level up.
Certifications and Training Options
While not always mandatory for basic operations, training dramatically improves your credibility and capabilities.
Basic Drone Pilot Certification (e.g., FAA Part 107 in the U.S. or Transport Canada’s Basic/Advanced RPAS)
Thermal Imaging Certifications (e.g., Level I Thermography by Infrared Training Center or FLIR)
Industry-Specific Workshops (e.g., thermal roofing inspection, solar farm diagnostics, agriculture analytics)
Training helps you learn how to:
Analyze thermal patterns accurately
Produce reports that clients trust
Avoid misreading data due to environmental effects

Turning Thermal Imaging into a Service
Thermal drone imaging is in demand across many industries—and you don’t need to be a giant company to get started. Many successful operators begin by offering local services like:
Home energy audits for homeowners or realtors
Roof inspections for insurance adjusters and contractors
Agricultural scans for farms during key crop cycles
Solar array checks for rooftop installations
Search and rescue support with local fire departments or park agencies
You can start with basic marketing:
Build a simple website with examples of thermal scans
Offer free demos to real estate agents or local roofers
Join online drone service marketplaces or local business groups
When to Upgrade Your Equipment
As your projects grow in scope or demand higher accuracy, you’ll eventually want to invest in:
Higher-resolution radiometric thermal cameras
Drones with longer flight times or better obstacle avoidance
Advanced software with batch processing and 3D thermal mapping
Professional insurance and licensing tools
But don’t rush—many professionals build solid side businesses using beginner kits.
Real-World Example
One operator began by scanning their own home for fun. A friend saw the results and asked for a scan of their rental property. Within a few months, they were charging for energy audits, invested in a FLIR-certified training course, and now serve clients across their region.
Thermal imaging isn’t just a skill—it’s a stepping stone to a niche market where expertise is still rare and highly valued.
Conclusion: From Curious to Capable
Thermal drone imaging isn’t just a trend—it’s a powerful way to explore, inspect, and solve problems from above. What once required ladders, labor, and long hours can now be done in minutes with the right drone and a bit of thermal insight.
By now, you understand the basics of what thermal imaging is, how thermal drones work, where they’re used, and what gear and software can get you started. You’ve seen how beginners like you are already using this technology to inspect rooftops, assess crop health, locate missing persons, and more.
The next step is simple: fly.
Start small. Try a scan of your own home or backyard. Experiment with color palettes. Practice interpreting what’s warm and what’s not. Before long, you’ll be spotting issues and patterns with a trained eye.
If you’re ready to go further, explore our comparison of beginner thermal drones and software tools. Or, check out our resources on training, certification, and how to offer thermal inspection services in your area.
Your aerial thermal journey starts here—and with every flight, you’ll go from curious explorer to confident operator.
Frequently Asked Questions
As you start flying thermal drones, you’ll quickly find yourself asking—and being asked—a lot of questions. Here are some of the most common ones new users face, along with clear, practical answers.
Can I fly a thermal drone without a license?
It depends on your country’s regulations. In most regions:
For recreational use only, you might not need a license (though registration may still be required).
For commercial or paid work, you’ll almost always need a certification (e.g., FAA Part 107 in the U.S. or Advanced RPAS Certificate in Canada).
Even if not required, getting licensed builds confidence and professionalism.
How far can thermal drones “see”?
Thermal cameras don’t “see” in distance the way optical cameras do—they detect radiated heat. A thermal drone can detect temperature differences at a distance, but image quality depends on:
Sensor resolution
Lens type (field of view)
Altitude and flight angle
Expect reliable thermal detail at 15–50 meters for entry-level drones. For long-range inspections, higher-end equipment is required.
What weather affects thermal imaging the most?
Thermal drones can fly in most weather, but certain conditions distort or hide heat signatures:
Wind cools surfaces and spreads heat unevenly
Rain and snow add moisture, blocking accurate readings
Direct sunlight (especially midday) warms surfaces, reducing contrast
High humidity can scatter infrared signals
Best time to fly? Early morning or late evening, when thermal contrast is strongest and solar radiation is low.
Are thermal drones legal in residential areas?
Yes—if flown legally under local drone rules. That means:
You stay within allowed altitudes (typically under 400 ft)
You’re not flying over people or private property without permission
You’re not using the drone to spy or collect data inappropriately
While thermal drones don’t show private details like faces or license plates, always respect privacy and notify property owners when scanning homes or buildings.
To Learn more about acronyms used in this article visit our Drones Acronym Page.